
My favorite planner system is The Happy Planner from Me & My Big Ideas. The versatility it provides, as well as the variety of styles available are two of the reasons I favor it. In this post, I share how to get started with The Happy Planner.
How did I get started with my Happy Planner?
A friend of mine, Molly Jo Realy, gifted me with a Mini Happy Planner. I used it as a gratitude journal. It was the perfect size to write a daily entry about what God had done that day or what I was thankful for.
Shortly after, I bought my first planner.
I use my Happy Planners for several things. My “catch all” planner is where I keep track of my household’s busy schedule, which bills are due, upcoming events, and my wellness journey. My faith planner is where I take notes on Sundays and as I study God’s Word throughout the week. I have a planner for each of my book projects. One planner is where I keep my business plans, goals, and checklists. I have several Happy Notes (notebooks) where I journal, process my thoughts, and take notes when I’m learning online or at a conference. Finally, I use the Big planners for memory keeping.
Where can I find a Happy Planner?
Happy Planners can be found in multiple places. I get mine at the local craft stores, such as Joann’s, Michaels, and Hobby Lobby. I’ve also seen them at Walmart during the back-to-school season. You can also order them online directly through The Happy Planner website.
What should I start with?
I highly recommend starting with a Classic planner. One that will suit your scheduling needs.
 What size should I buy?
Size would depend on what you wish to do with it. If you are only keeping track of your schedule, a Mini Happy Planner may suffice. Do you have a child or two or multiples? Are you fostering? A chronic kid mom? If you have a smaller household size and fewer appointments, a Classic Happy Planner will work just fine. For those who have crazier schedules, a Big Happy Planner may be best for you. If you are homeschooling, then I recommend a Big Happy Planner.
Mini Happy Planners are about the size of a regular journal. Classic Happy Planners are about the size of a composition notebook. And Big Happy Planners are the size of a regular notebook.
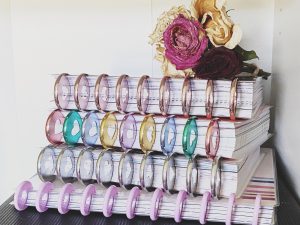
Disc Love
Another thing that I love about Happy Planner is the expansion rings. If you want to add pages to a planner of any size, you can swap out the discs for a larger size. There are mini, classic, and expansion sized discs. The pages are super easy to pull out and put back in, as well.
There are so many options! How do I pick?
Getting started with the Happy Planner can be complicated with so many options to choose from. Especially if you’re one who gets easily overwhelmed by such a task. The question to ask yourself is: What is my style?
Happy Planner has something for everyone.
Do you like bright colors or muted colors or black and white?
Do you like flowers? Books? Animals? Rainbows? Art? Disney?
Do you like to garden? Are you a teacher? Do you faith journal?
Are you a farmhouse fanatic? Homebody? Fitness guru? Do you really want to take care of yourself this year?
There are planners for all of the above and then some.
What layouts do The Happy Planners come in?
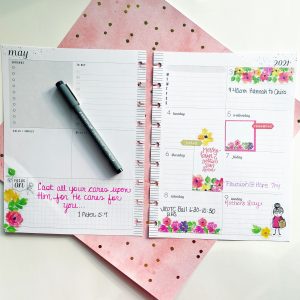
Every planner has a year in review at the beginning of the planner and a monthly spread at the start of each month, prior to the weekly spreads.
Dashboard Layout
The Dashboard layout has a “dashboard” on the right page of the weekly spread where you can list things you need to buy, appointments or meetings for the week, take notes, etc. On the left side of the page are the days of the week with enough space to write things in. For my household, I love this planner.
The Vertical layout has three rows for each day of the week. The days of the week are laid out vertically across two pages. This is classic Happy Planner style. It’s the layout I’ve used most.
The Hourly layout is also vertical, but instead of having three boxed rows for each day, it’s lined for hourly scheduling. At the top of the column for each day, there’s room for your top three priorities for the day. Or stickers! The days of the week are spread vertically across two pages.
The Colorblock Layout is also a vertical layout, but it has 6 colorblocks in each row.
The Horizontal layout has the days of the week horizontally spread across two pages. The Minis tend to have this layout. The spaces are typically lined. And there’s one space each week for notes.
The Monthly Layout is perfect if you like to-do lists. In this layout, there are pages at the front of the month where you can set goals and make plans, take notes, etc. The following pages are lined in blocks so that you can write a daily checklist and check off items as you go through your day. There are also 2 pages for notes at the end of the month. I like to use this for my business planner.
For you teachers and homeschoolers, the Teacher layout has a planner-book-style layout where the days of the week go horizontally down the left side of the left page with lined columns in blocks across the rest of the left and all of the right page.
What about all these accessories?
Accessories are an individual thing. Do you like to keep things together? You may want to purchase a pack of folders. If you’re a sticker fanatic like I am, you’ve got plenty to choose from. Do you like sticky notes? They have them. I take a lot of notes, so I love buying their paper packs, which come in a variety of types and all the sizes. For those who love bullet journaling, they have dot grid paper. There is lined, blank, and grid paper as well. They also have plastic envelopes, which are handy for budgeting.
What I love about the accessories is that they are all themed with the planners.
The one accessory I recommend you buy with your planner is a dashboard. I know we talked about the dashboard layout above, but this dashboard is different. It’s a plastic, tabbed divider that you can use in your planner to mark where you are within your planner or divide your planner into sections. The tab will stick up from the top of your planner, not the side, where your monthly dividers are.
These are basic tips for getting started with The Happy Planner. For more information, please visit The Happy Planner’s Getting Started page, where you’ll find four short videos that explain the basics of Happy Planning.
For ideas on layouts and how to decorate your planner, you can find a multitude of pictures and videos on social media.
You can search the following hashtags on Instagram:
#mambihappyplanner
#thehappyplanner
#planahappylife
#mambi
#meandmybigideas
You can search the following on Pinterest:
Happy Planner
Happy Planner Ideas
Happy Planner Layout
Happy Planner Ideas Inspiration
Happy Planner Ideas Create 365
What’s one thing you look for in a planner? We’d love to hear from you in the comments below!


0 Comments