
Organizing your craft room/home office doesn’t have to be rocket science, nor does it have to take a long time. I spent two days reorganizing mine and am so incredibly thrilled with my results. Join me in discovering how to organize your own craft room/home office so that your time spent creating is increased because of the efficiency of your organized space.
Please Note: This post contains affiliate links. If you click through any of them, I may earn a small chunk of change with which I may purchase more craft supplies or another rolling craft cart (that would probably take some saving up for). You would not be charged any extra for your order, should you decide to place one via my affiliate link.
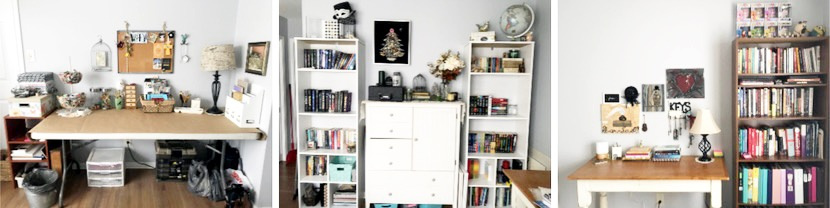
When we first moved into our new home two years ago, I organized my craft office with what I had available to me, along with a couple of bookshelves I went out and purchased. I’d been following several #bookstagrammers and absolutely had to have those white shelves in my new creative space.
Fast forward two years, and I’ve run out of room to store everything. I’ve also developed an addiction to Happy Planners. And I’ve taken up mixed media art and Bible journaling, so my supplies have increased as I’ve tried new techniques.
My office was becoming unorganized and my storage space had begun to overflow onto surfaces meant for working and the floor.
When I learned that we were going to get our tax returns and our stimulus checks around the same time, I began planning to pull apart and organize my office in a way that benefited what I wanted to accomplish in my workflow. I have to have my space organized and clean in order to get any significant work done. Disheveled places are a huge distraction to me.
So, I decided I would buy myself two more of the same white bookcases to complete my wall of books. (Turns out, they were slightly different – a different brand, most likely. But they still worked.)
My first step was to remove everything from my bookcases and the dresser that held most of my craft supplies.
Here is what that looked like:

I moved the dresser out of my office. It will end up in my bedroom, as I’ve been living out of clothes baskets and a closet for the past two years. And since I bought the bookcases, I don’t have money for a dresser too. Priorities! LOL.
I assembled the bookcases and two craft carts. Then, I added the bookcases to my Wall of Books:
My next step to organize my crafting office was to put my books back on the bookcases …
…and figure out how I wanted to organize the one bookcase I am going to use for my crafting supplies.
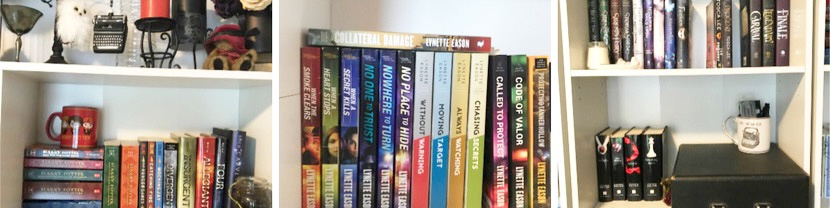
I organize my books by author and genre or subject. I love the rainbow displays some bookstagrammers do with their shelves, but that would drive me crazy. I wouldn’t be able to find any of the books I was looking for if the series were all mixed up with other books. I am a bit OCD in these ways. So, I have all of Maggie Stiefvater’s books on a shelf with retellings of fairytales from authors like Marissa Meyer. I have Harry Potter with Hunger Games and Veronica Roth’s books. I have all of my dragon novels on one shelf and all of my children’s books on another. You get the picture.
Something you may wish to consider when buying books: Do you prefer hardcover or paperback? Do you care if you have a blend of each when it comes time to organize a series on your shelves? My sister is a die-hard hardcover book collector. She prefers them. And she doesn’t tolerate a blend of soft and hard covers when she is organizing her bookshelves. Me? I prefer hardcover for a favorite series, but I don’t mind soft cover. I do prefer consistency in a series, but if I end up with one or two of the opposite within the series? I won’t freak out.
Here are a few ways you could organize your books:
1. Put all of one author’s books on one shelf, if you have favorite authors whose books you buy as soon as they’re available for preorder.
2. Organize them alphabetically by the author’s last name. Or by their first name.
3. Organize them by color of the covers. Like a rainbow.
4. If you read multiple genres of fiction (YA, Romance, Suspense, Horror, etc.), organize them by genre. If you read nonfiction, organize them by topic (marriage, parenting, homeschooling resources, budget, etc.)
5. Turn all of your book spines to face the back of the bookshelf and guess which one you’re going to pull off. You’ll be surprised every time, but your entire case will be white! LOL.
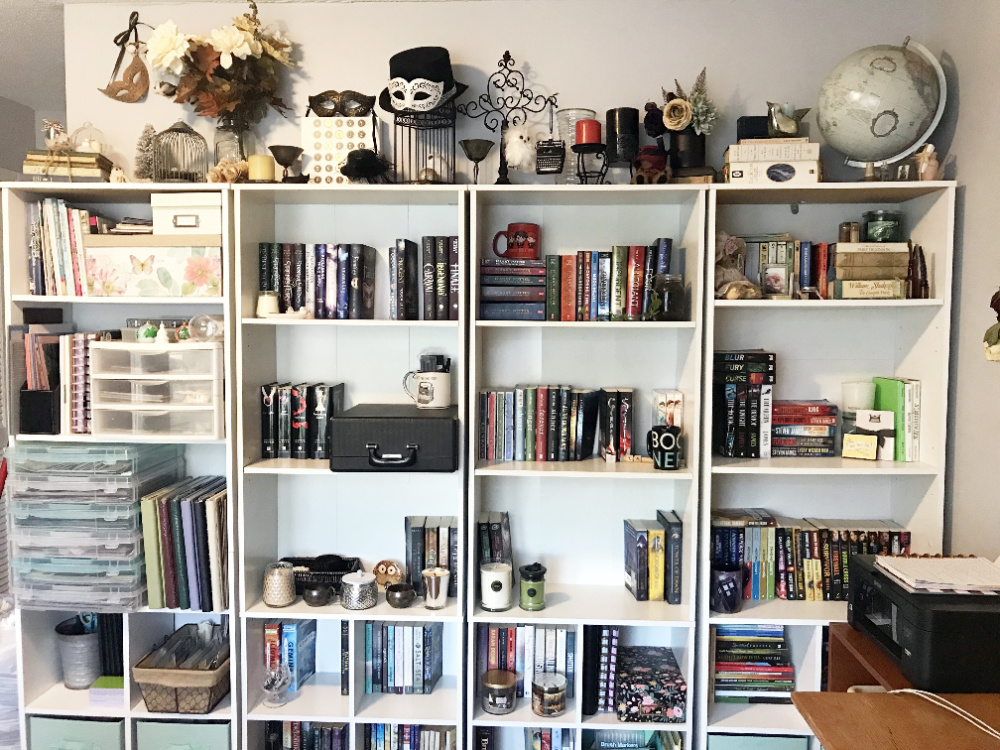
The next step to organizing my bookcases was to add all of my decorations back in.
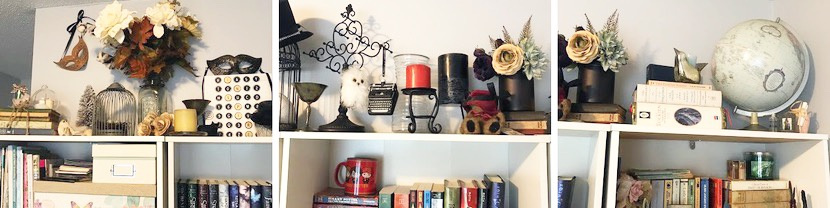
One of my favorite features of my office is the top of my bookcases. I love displaying all of my treasures for guests to see. (And I just love to sit back and look at them every now and then. They make me smile.)
I love to create bookstagram photos, so I have a growing collection of items to use in flat lays. Some items I collect are:
silk flowers – books – ornaments – books – jewelry – books – candles – books – mugs – books – masks – books – pens – books – typewriters – books – birds – books – bottles – books – hats – books – scarves – books – Pop figures – books – paper items – books – keys – books – pinecones
When I decorate and organize, I consider a variety of factors:
1. Color: Do these colors go together? Do they contrast each other well? Do I need a pop of a particular color here?
For example: The candle stand in the middle photo where the black pillar candle stands was empty. I needed a candle to fill that space. So I looked at the colors around it and, after trying a white candle I already had, decided black was the best color to go there.
2. Style: (country, steampunk, cottage, modern, etc.) I love farmhouse/country/cottage and steampunk. When done right, these styles of decorating can go really well together. You should see my kitchen. It’s a fun blend of steampunk (metals) and country (roosters).
3. Function: What function does the item in your hand serve? Decorative? Purpose? Put like functioning items with like functioning items. Then add a touch of the others.
For example, you can see my typewriter (black case) on the shelf with my Twilight books in my book organization photos. That is the one of the three typewriters I own that functions well. Which means it’s the one I use when I’m creating things to sell. It’s mixed with my books, but it is available to easily pull from the shelf and place on my writing or crafting tables when I need it. As it is on the shelf, it’s decorative. When in use, it’s functional with a purpose.
4. Similarity: This is a key when organizing, but it can be decorative as well. Put like things with like things. That way, when you need something, it’s easy to find the one you’re looking for. This was an issue before my reorganization of my crafting office. I had too many things shoved too many places – and not together with their like kinds – because I was running out of room to store items.
When decorating, this works well too. Keep books together. If you want to use books in multiple places, stack books of like kind. Bottles look great clustered. So do candles. Like kind. Like style. Like function. It works!
5. Frequency of Use: This is important. If it’s an item you use often, keep it close at hand. Don’t bury it in a drawer or a closet. You won’t want to have to pull out a bunch of stuff in order to find that one pair of scissors you’re looking for. That’s a huge waste of time for something that has a simple fix: keep the scissors in a cup with other frequently used tools on your desk. Bury the punch you haven’t used in three years in the back of the closet.
6. Size: When organizing and decorating, understanding the size of something and how it fits into a space is important. These things matter when you’re assembling bookcases and rearranging your furniture. They also matter when you’re fitting many objects into one space. You want to be sure you have enough room for everything. If there isn’t enough room, you may need to add another furniture piece or basket or move some things around again until they all fit.
7. Texture: What are your favorite textures? I personally love metals, book covers, antique laces, linens, and soft, fuzzy blankets. I like oatmeal teddy bears. Ceramics. Leathers. These can all go well together. Are your favorite textures aesthetically pleasing when combined?
Pin It!
Now it’s time to go through all of those craft supplies and get them organized in a way that makes logical sense.
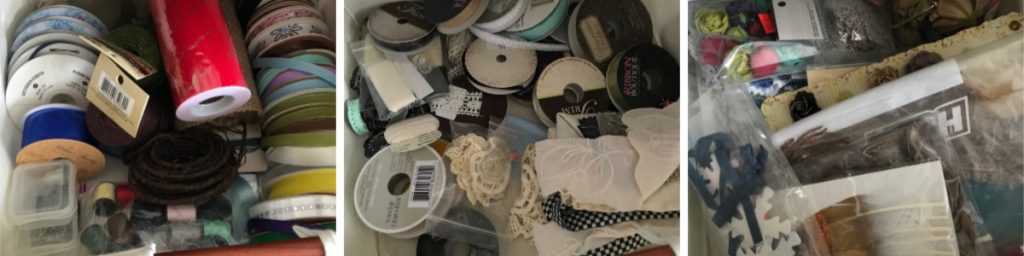
Ribbon and Mixed Media Element Storage:
I have a stand by my craft table that has three drawers. In these drawers from top to bottom (left to right in the photo above) are:
Top (Left Photo): Colored ribbons, floral twines, and sewing supplies. I use my needles and threads frequently, so these are immediately accessible.
Middle: Lacy ribbons and swatches of lace, embroidered cloths, and crocheted items.
Bottom (Right Photo): Paper flowers, feathers, and snowflake stickers/ephemera. These I use frequently in mixed media art, so they are immediately available as well.
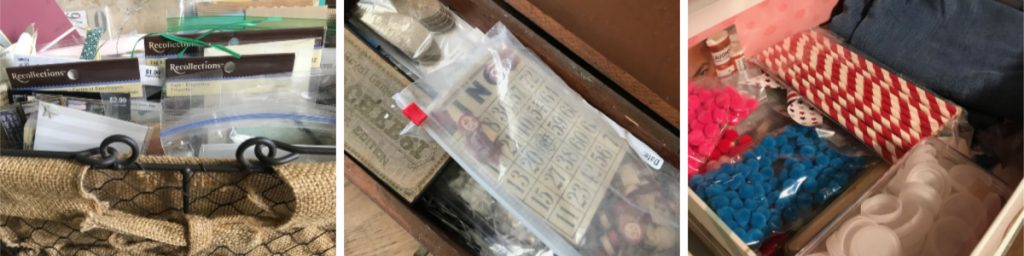
Mixed Media Ephemera Storage:
I have a ton of mixed media elements floating around. Here, I organized several of those elements:
Left: This is a basket full of paper elements like tags, paper scraps, note cards, paint swatches, envelopes, etc.
Middle: This is an antique fishing tackle box (wooden) that holds my metal and other material ephemera. Think clips, game parts, metal ephemera from Tim Holtz… Basically anything that would look awesome on a steampunk art piece.
Right: This is my box (the butterfly box on my shelf) that holds all of the items I probably won’t use on a regular basis. See those plastic bottle caps? I planned to make a mixed media art piece out of them several years ago. I still haven’t gotten around to it, but I will one day!
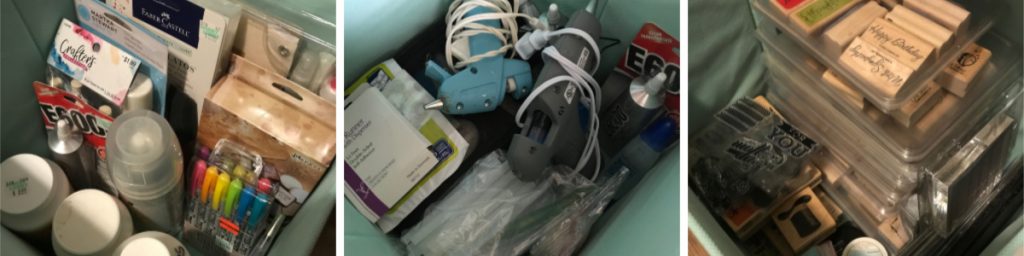
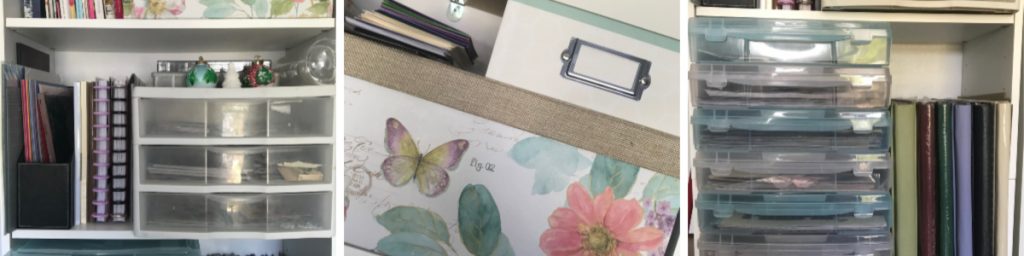
Crafting Supplies Organization:
Here, I’m using the cloth bins that you can buy for cube shelf storage. Since my bookshelves are white and my craft carts are “mint” or “turquoise” (depending on how you color it), I bought “mint” cubes for my bookshelves. My cube spaces have four slots, so I bought four bins to fit into four out of sixteen slots. I didn’t need more than that, and I like using the slots as shelves.
Left: This is all of my mixed media mediums that aren’t paint or colored pencils or markers or pens. So, it’s full of gelatos, distressing mediums, ModPodge, gesso, and other such items. Note: The E6000 (jewelry/craft glue) has been moved to the middle bin.
Middle: This bin is full of my adhesives: tape runners, glue dots, glues, glue guns, etc. It’s all in one place, so I only have to grab one bin when I need an adhesive, instead of the three different places I had these items before.
Right: Stamps. Stamp Pads. Stamp cleaners. Embossing supplies.
The fourth bin, not pictured here, contains all of my plastic baggies, cloth bags, boxes, and tags for jewelry packaging.
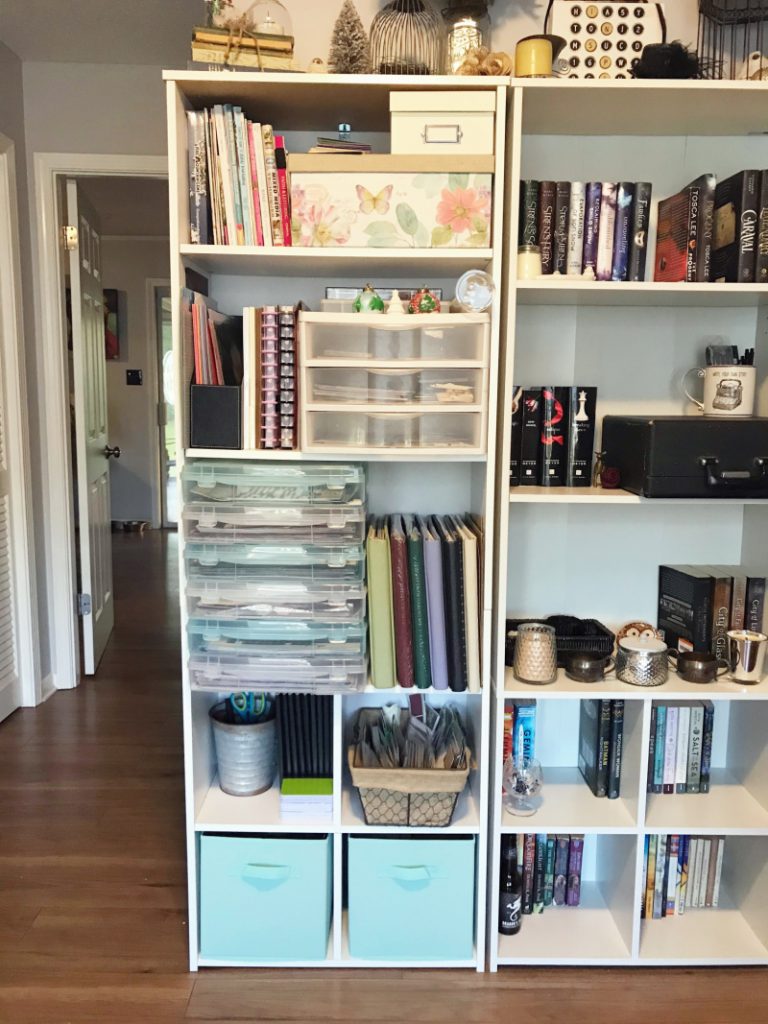
Organizing Scrapbooking Supplies:
Prior to this setup, I had the dresser you saw in previous pictures stuffed full of scrapbooking supplies and stamping supplies and mixed media supplies. The wide, bottom drawer of that dresser felt like it was going to snap off and fall to the ground every time I opened it. I was tired of having to hunt for the papers I wanted to work with and sort through a basket full of stickers (that now holds my mixed media paper ephemera, as mentioned above). This works SO MUCH better!
Left: My cardstock, my Memory Keeper Happy Planners for 2019 and 2020, and a bin with three drawers that now contains my sorted stickers. Drawer One contains stickers for particular projects (like kids’ albums). Drawer Two contains all of my “pretty” stickers (flowers, birds, butterflies, steampunk, Illustrated Faith, etc.). Drawer Three contains fall and winter and Christmas stickers. Note: I still have a binder filled with page protector sleeves full of organized by subject stickers under my craft table. These are already designated for different scrapbook albums, so I have them separated.
Center: The butterfly box. That’s full of all that ephemera I don’t use often. But the box above it is filled with scrapbook paper that is precut to back pictures and journaling boxes. I’m still in need of purchasing another photo box to store the card envelopes and pre-folded cards I have for my card making activities.
Right: Here, you can see that I’ve stood new scrapbooks to the right of the bins that now hold my organized scrapbook papers (It took six of them!).
TIP: It’s important to recognize that you will need to organize your supplies THEN put them back on your shelves or into drawers.
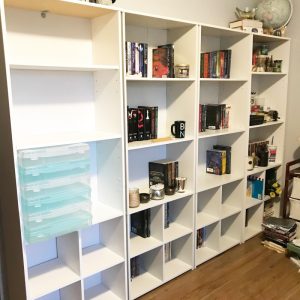
Now, my craft bookshelf is complete:
Organize Happy Planner Supplies On a Craft Cart:
I am a Happy Planner addict (I think I said that before.). I love using their planners! (👈🏻 Click to find out why.) It took me a lot longer than others, but I finally bought a craft cart (this links to the exact one I have) to store my planner supplies on. Now, instead of hauling a basket of stickers, a basket of washi tape, a pack of markers, refill paper packs, discs, and a host of other things – PLUS my stack of planners – all over my house, I can easily roll this cart wherever I want to plan that day. What a life saver! (And back saver!)

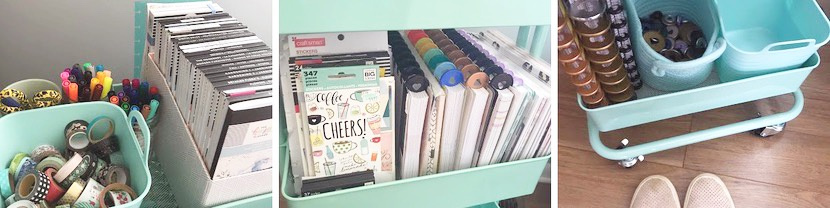
Top Shelf: Here are my sticker books that I most frequently use, my beloved washi tape, new markers, and a coffee cup with my tools (scissors, more pens, etc.) in it.
Middle Shelf: Here are my planners for next year (yes, I bought ahead!), the stickers I once pulled out of my sticker books to organize them better and decided I hated that method of organization, and refill packs of pages, dashboards, and old dividers that I will recycle.
Bottom Shelf: Currently used Happy Planners, a basket of discs, and my HP punches. The empty container has been removed since this photo was taken. It’s now in my bedroom waiting for a new purpose.
If I didn’t have the cart, these would all be on a bookcase, just like my other supplies. Or in a pile in the middle of my bedroom floor. LOL.
Organize Paint Supplies On a Craft Cart:
I use acrylics and watercolors more than any other paints. So that is what I will demonstrate my organizational preferences with.
First, I needed a drip catcher for my cart. I am storing my blank or prepped canvases on the bottom shelf of my cart. I don’t want paint or cleaners or mediums to drip onto those. So here’s what I did:
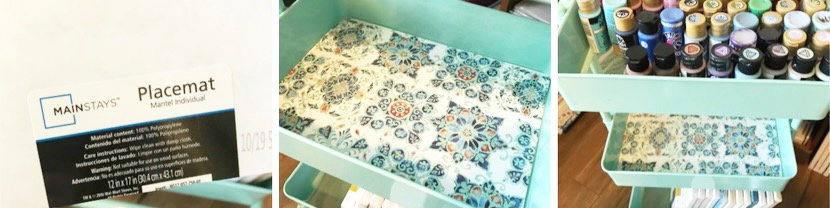
First, I purchased a cheap plastic placemat. I got mine at Walmart. It cost $1.98 or so.
Then, I cut the placemat down to fit snuggly onto the middle shelf of my cart and inserted it there.
Now, if anything drips, I can quickly clean it off the mat and won’t have to worry (too much) about the canvases below.
Let’s talk about how to organize and track the paints:
![]()
First, let’s talk about organizing paints. In my cart, you can see my paints. These are all acrylics.
I have organized them in rows according to colors.
Top to Bottom: Whites – Grays – Blacks – Browns – Yellows – Oranges – Reds – Pinks – Greens – Turquoises – Blues – Purples – Metallics
If a paint bottle is flipped upside down, it’s halfway or more empty. I will need to replace it, unless the exact same color is upright next to it. Then, I know that I need to use the almost-empty paint bottle before opening the new one.
Next, let’s talk about tracking paint supplies. I’ve given you a couple of pictures of the notebook method I decided to use while I was cleaning and organizing the office.
- I designated a page in the small notebook (so it easily fits in my purse and isn’t bulky to carry) to each color of the rainbow and a few more, plus metallics.
- I gave myself two columns to the side. “H” stands for “Have.” “N” stands for “Need.”
- Then I wrote down every brand and color of paint I have in those colors. The brands are labeled with initials. Then the colors are written in next to the brand.
- A check under “H” means I have that color and don’t need any.
- If I have a small tally mark in the “N” column, then I know I need that paint color because my supply is low.
- Once I purchase the color, I will hash across the tally mark to show I’ve resupplied the color needed.
- The next time I need the color, I will put a new tally mark in the “N” column.
Here is my paint supply cart:
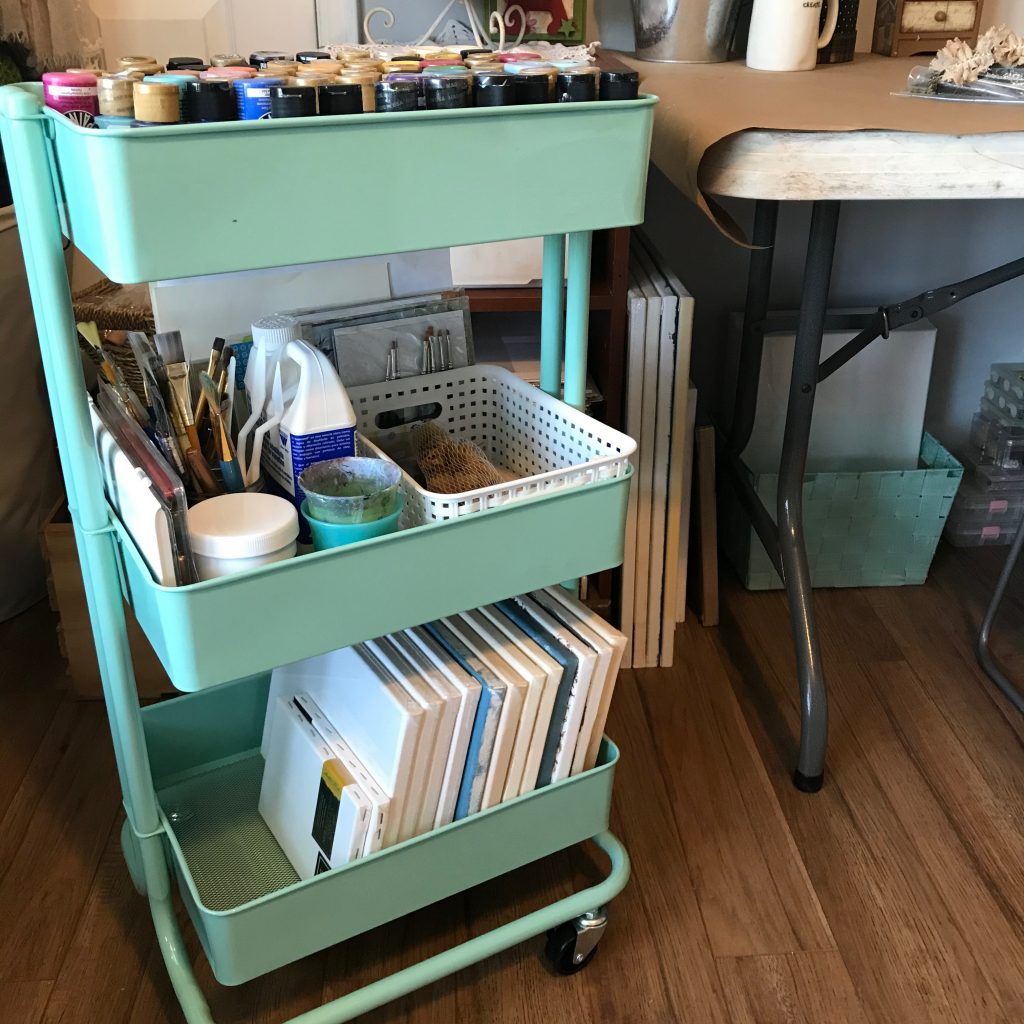
Top Shelf: Acrylic Paints
Middle Shelf: Paint Brushes, Cups for water when painting, Pallets, Paint Mediums, Cleaners, Stencils, and other paint supplies.
Bottom Shelf: New and prepped canvases.
You will note the larger canvases leaning between my craft table and a cart behind and right of the paint supply cart. Under the table is a basket with more canvases in it. That is most of my paint supplies. I use the canvases mostly for mixed media artwork.
The Final Results of My Efforts to Organize My Craft Room/Home Office
Now that most of my supplies had been organized, I went through the remaining piles of papers on my desk, putting things in their proper places, until I didn’t have a single pile left in my office. Here is the final result:
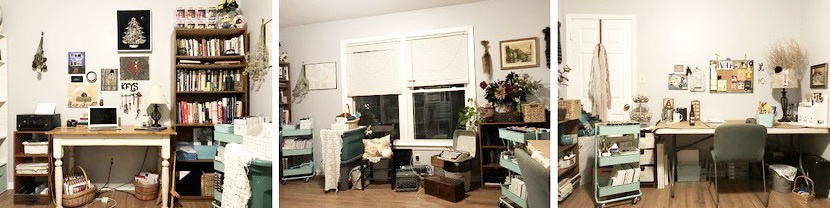
Left: Writing Desk/Writing Books/Happy Planner Craft Cart
Middle: Front Windows/Totes with Artwork and Files to Go Through/Journaling Shelf with Bookstagram Flat Lay Materials
Right: Craft Table and Paint Cart (All of my jewelry-making supplies are stored under this table.)
And, last but definitely not least, I give you The Book Wall:
No matter your preferred craft or creative bent, organizing your craft room or home office space should not be an issue.
It doesn’t have to be. No matter how disorganized you may think you are, there are things you can do to make yourself a space where you can go to create without frustration.
Here are my tips for organizing that space:
1. Know how much space you really need.
- If you find that your room is beginning to look like an episode of Hoarders, it’s time to clean out. Begin to go through your supplies. Just as you would your clothing closet, ask yourself, “Have I used this in the past year?” If the answer is no, and you do not have a definitive plan for it (like I do my bottle caps), do one of four things: give it to a friend, throw it in the trash, thrift store it, or sell it.
- If you have too much stuff but not enough space (but you’re definitely not hoarding your favorite things), use what you have until you have created enough space to store more. Then go shopping again.
- If you have a need for more space, find some. Use a bigger room in your house (Could you trade your bedroom for your craft room?). Rent a space (Where I’m from, they’re turning a lot of old mills into art studios.).
- If you have a large space with fewer supplies stored in it, be aware of how much room you have to grow.
2. Everything has its place.
- When you’re tempted to be lazy and just toss that pad of scrapbook paper you just purchased on the craft table, don’t. Put it away.
- When you’re finished creating for the day, clean your tools and put everything away.
- When you buy something new and aren’t sure where to store it, figure that out on your way home and put it wherever you decided when you arrive.
- Make sure everything has a shelf or bin or drawer or closet to go into. Don’t let little piles of stuff grow around the room.
3. Do what works for you.
- Are you better with bins than shelves? Do that.
- Are you better organizing with color codes than words? Do that.
- Are you so disorganized you can’t even move? Get help. Do that.
- Are you better at keeping track of your supplies on your phone (digitally) than on paper? Do that.
We are all created with a unique set of creative gifts, talents, and personalities. Some of us are better at English than at math. Some are better at tech stuff than painting. Some of us are better at writing than gardening. You have to do what works for you. And if something isn’t working for you when you expect it should, ask yourself why. Are you getting in your own way? Are you afraid of something? If so, get out of your own way and get back to organizing. If not, try a different method. Try a different style. I could be something as simple as not really liking a color choice or pattern or texture. Which leads to my next point:
4. Switch it up.
Don’t be afraid to change things when they don’t work for you. Or when you get tired of seeing the same two colors every day. Or when the layout of one shelf keeps grabbing your focus when you’re trying to create. Change can be a really good thing. Be open to it.
5. Make it yours.
Not everyone likes simplicity. Not everyone likes murals painted on the walls. You have a style of your own. You know what it is. Or at least you’re torn between two or three styles. Play around. This is your creative space where you will create things. Be creative with the space itself. I love steampunk designs. I also love the antiques and warm feels of farmhouses. The two actually blend well. But I wouldn’t have known that if I hadn’t played with my decor.
Be sure to add personal touches too. Your artwork. Photography. Music. Crocheted blanket. Put your personal touches to work in your office decor.
It’s important for you to have a space where you can get away from the everyday routines of life and create something glorious. I hope this article has helped you to create that space and organize it in a way that makes creating things more efficient for you, saving you time so that you have more of it to craft or do business with.
If you have any questions about organizing or creating a space that suits you and your needs, please feel free to leave a comment below. I’d be happy to respond!


0 Comments